Getting Around #
After selecting a table, Dynamo-Browse will perform a scan and present the results in the default view mode.
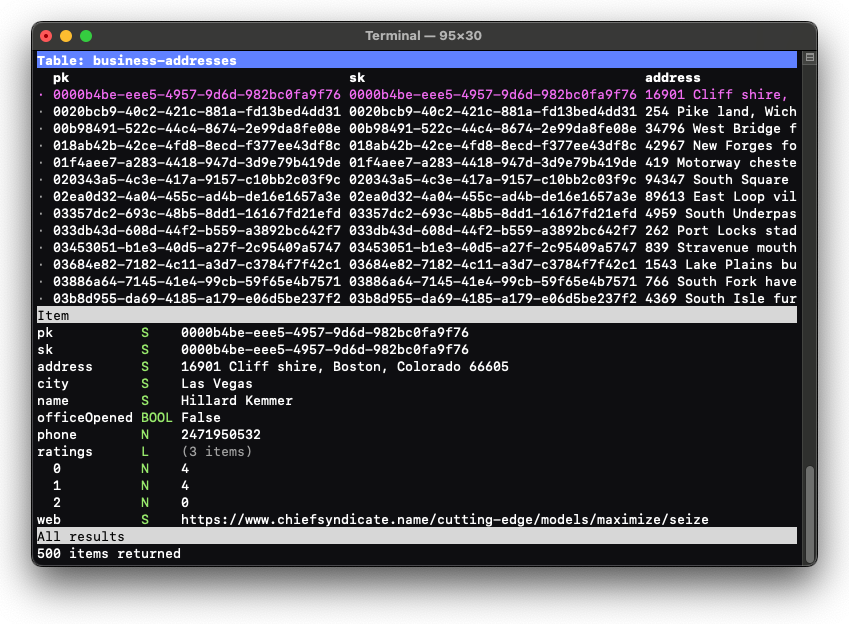
This mode consists of three panes:
- The top pane displays the result-set of the last scan or query. The table name is at the top-left.
- The middle pane displays the attributes of the currently selected item, along with their type.
- The bottom pane displays the current query or filter, plus any messages. Prompts for input will also appear at the bottom.
The result-set is sorted in ascending order based on the value and type of the partition and sort key. Up to 1,000 rows will be displayed for the current result-set.
Since DynamoDB does not require all items to have the same attribute (unless they are pre-defined), any
attribute not set for a column is indicated with a grey tilde character ~.
Use the following keys to change the currently selected row, which is highlighted in purple:
- ↑/i: Move selection up
- ↓/k: Move selection down
- PgUp/⇧I: Page up
- PgDn/⇧K: Page down
- Home/0: First row
- End/$: Last row
The columns of the table consist of the top-level attributes of the result-set. The partition key, sort key, plus any explicitly defined attributes will always be displayed from the left margin onwards. The other attributes are determined from the results of the last scan or query, and may change depending on the result.
The display columns of the table can be scrolled across by using the following keys:
- ←/j: Scroll to the left
- →/l: Scroll to the right
The attributes of the currently selected item will appear in the middle pane. Both the type and the value of each attribute will be displayed. Any nested attributes will be indented, and will below their parent item. A value displayed in grey does not represent the actual value of the item, but indicates some meta-information about the item, such as the length.
The Back-stack #
Changes to the view of Dynamo-Browse will be maintained in back-stack, similar to how a web-browse keeps track of the webpages you’ve visited. This stack will record the currently viewed table, filter, or query, allowing you to “go back” to a previous view by pressing Backspace. Pressing \ will allow you to go forward through the stack.
The back-stack is preserved in the workspace file, and can be restored by launching Dynamo-Browse with the -w
switch. Launching Dynamo-Browse with a workspace that has a non-empty stack will restore the last viewed
table, filter, or query from the session that was previously using the workspace.
Note: the back-stack does not preserve the actual items in the workspace. Going backwards or forwards through the back-stack will execute any queries or filters against the actual table itself.
Adjusting The Layout #
The horizontal size of the item table and currently selected item pane can be changed to one of the following layout configurations:
- Item view taking up 14 rows on the bottom with the table pane taking up the rest of the vertical space (the default)
- Item view and table view taking up half of the available space
- Table view taking up 7 rows on the top with the item view taking up the rest of the vertical space
- Table view hidden
- Item view hidden
Pressing w will cycle forward though these layouts. For example, while in the default layout, pressing w will switch to the second layout, where both the table view take up half the screen. Pressing ⇧W will cycle through the layouts in the reverse order.
Adjusting The Displayed Columns #
The columns of the result-set can be adjusted by opening up the Fields Popup. This popup can be opened by pressing f.
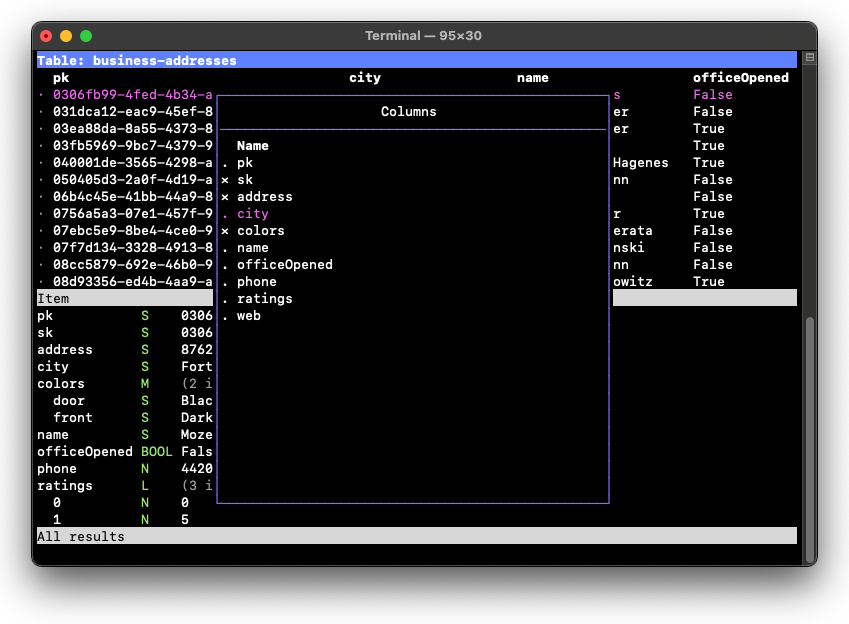
While this popup is opened, the following changes can be applied to the displayed columns of the main table:
- Columns can be hidden
- The order columns appear in the main table can be rearranged
- New columns can be added
The popup will display the list of columns of the main result-set table. Pressing ↑/i or ↓/k will move the selection indicator to the column to apply the operation. Pressing ←/j or →/l will scroll the main table left or right so that any operations can be previewed.
To reset the columns to the top-level fields of the current result set, press ⇧R.
To close the popup, press Escape.
Showing And Hiding Columns #
In the Fields Popup, each row has a symbol indicating whether the row is currently visible (.) or hidden (✕). Pressing
Space will toggle whether the currently selected column is shown or hidden.
Re-arranging The Order Of Columns #
The currently selected row can be moved up or down the table. This will move the corresponding column in the main table either left or right.
Press ⇧I to the selected row up, which will move the corresponding column left.
Press ⇧K to the selected row down, which will move the corresponding column right.
Adding And Removing Columns #
New columns can be added in the table. The value of these columns will be determined by the result of a query expression, and can be used to expose fields that are not at the top level.
Any nested fields of maps or lists will not be included as a column by default. Consider, for example, a table of books with authors structured as so:
{
  "book": {"S": "The Lord Of The Rings"},
  "author": {"M": {
    "firstName": {"S": "John"},
    "middleName": {"S": "Ronald Reuel"},
    "lastName": {"S": "Tolkien"},
  }}
}
If you wanted to show the the author’s first and last name in the main table, rather than just see the description (3 items), you
can add a new column with an expression selecting the fields of the author map. The expressions that can be used here
are as follows:
- First name:
author.firstName - Last name:
author.lastName
This can be extended to expressions that perform comparisons or operations. For example, the expression author.firstName ^= "J" can be
use in a new column to display True for any first name that begins with a J.
To add a new column, press a while the Fields Popup is visible. You’ll be prompted to enter a query expression, which will be evaluated over each row within the result-set when displaying the table.
Any column, that was either retrieved from the result-set or added by the user, can be deleted by selecting the column within the Fields Popup and pressing d.
Entering Commands #
Commands can be entered by pressing : and entering the command, with any arguments, at the prompt.
The list of available commands can be found within the reference section.